Showing posts with label collage. Show all posts

Tuesday, April 14, 2020

Something Good is about to Happen

Hello friends,

Hope you all had a wonderful Easter weekend.  Ours was peaceful and even included a drive up the coast because the weather was so beautiful and the hills were so green from all the rain last week.  One thing about the mountains and the ocean, you can still enjoy the beauty just driving by.

I didn't have a specific idea for a project to work on so I chose to prep a few different substrates and see if any ideas flowed from there.  I ended up painting a Vignette Tray, two flat canvas panels and one thick canvas panel, which is the one I used for today project.   I had all the substrates in my art room, which made them not only easily accessible, but also a fun way to challenge myself.

I didn't take many step-out photos since this is more of a "gut instinct" project (meaning you work quickly without thinking too much) but I have a few just so you can get the basic progression.  Follow along and I'll show you what I did...
The wood frame stretched canvas is 8 x 10 x 1 3/8".  I used Collage Medium to adhere vintage paper to the surface and then added coat over the top to seal.  You can see that there are a few bubbles and creases but you will never see them in the end so don't worry about that.  Vintage paper is usually thin and can be very unforgiving compared to using todays patterned paper, but it's absolutely worth it to create the perfect base.
I added a postcard from the Layers Remnants pack.  I picked this one because I thought it looked so peaceful and I love the color green against the vintage paper.
So here is a big jump!  Let me explain what I did:
1.  I cut random sized strips of patterned paper with my rotary cutter then used Collage Medium to adhere them to the surface, criss-crossing on the left side.
2. I cut out the girl from a Photobooth picture and glued her into place.  The small flower is from the Layers Botanical pack.
3. One everything was dry, I scribbled Walnut Stain Distress Crayon over the surface and rubbed it in with a damp finger, making sure I built it up at seam lines and corners.
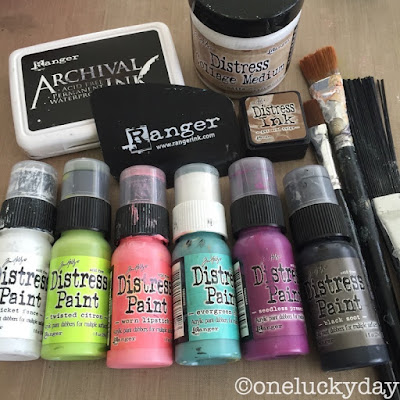
4. With a 1/2" paint brush I brushed on some Tumbled Glass Distress Paint.  The Distress Paint is thin compared to acrylic, so it lets the vintage paper shows through.  Don't think about the paint too much.  Just paint it on to balance the surface space and let the paint dry.
5. I wanted to add black circles but I was not sure what to use...I had just thrown away an empty jar of Collage Medium so I dug it out of the garbage and used the lid as a stamp tool.  I just spread the black paint on my glass mat and pressed the lid into the paint and onto the canvas.
6. A few phrases from the new Clipping Sticker book (seriously where would I be without it?) we're chosen.  I found enough to go together that I decided to separate them into two word blocks.  Remember to adhere the strips close together so they read like poetry.  I painted Collage Medium over the stickers to secure to the canvas.
When I was painting with the Tumbled Glass Distress paint I had some leftover on the small brush.  This allowed me to paint around the girl and make her stand away from the surface of the postcard.  Almost like her shadow behind her.  I did use a Detailer Water Brush to tint the girl with Distress Crayons.
Cheeks: Aged Mahogany (remember...tap, tap, tap for cheeks)
Scarf: Mustard Seed and Aged Mahogany
Coat: Walnut Stain
Now to balance out some of the empty spaces...I added the butterfly and the flower dictionary cutout, both from the same Field Notes Ephemera pack.  A layer of Collage Medium was added over the top of each so I could use Crayon to color (as in the case of the dictionary flower).
Large numbers from Typeset Collage Paper were added.  I used the Detailer Water brush to cut away numbers from the roll then used Collage Medium to add them to the surface.  You will see in the final piece that I ended up adding more numbers at the top and to the right.  I love that with the right application, Collage Paper becomes translucent over the printed background (that is key).  Such a great product no matter the pattern.
Peeled Paint and Walnut Stain Distress Crayon was rubbed onto the Tumbled Glass paint.  This really added depth to the circles.
White marks were added with a Posca pen.  Once dry, I sanded over the marks with steel wool and rubbed more crayon over the top.

And that does it.
I love the additions of the Collage Paper numbers, the Peeled Paint crayon over the blue paint and the Posca pen marks.  This was a fun project to create in a short time.  I think creating the canvas with the vintage paper one day and making the collage the next was key for me.  Somehow walking to the art room with a substrate ready to go made everything seem easier and more fluid.  Now to make something with the three other substrates!
Oh, and by the way...did you notice that all the creases and bubbles in the vintage paper have disappeared?

Thanks for stopping by,
Now carry on,
paula

Wednesday, June 13, 2018

Today is Full of Possibilities

Hi everyone!

This past week I got the new die set called Funky Floral 3.  I love the Funky Florals (1, 2 and 3) because they just give you so much variety in one set.
The dies look like this - As you can see, each dies has all the pieces to that flower or leaf.  I like that...no more guessing what pieces go together.  It's also easy to keep track of the dies because they are bigger!
I cut the some of the flowers using Distress Watercolor paper.  I colored them with a variety of Distress Ink in Tattered Rose, Worn Lipstick and Mustard Seed.  The green is Peeled Paint, Evergreen Bough and Bundled Sage.  I added Clear Rock Candy over the flowers to give them some sparkle and texture.
So now what to do with the flowers I created?  I decided on a Framed Panel with a favorite Paper Doll.  Follow along and I'll show you what I created...

First I used Collage Medium to adhere paper from the French Industrial paper stash as a foundation for the collage.  Then I cut/ripped up pieces of Worn Wallpaper and layered them on top.  A final coat of Collage Medium over the top of the wallpaper and I left it to dry.
 
Once dry, I scribbled Gathered Twigs Distress Crayon over the edges of the paper and rubbed it it. Remember to use a wet wipe to manipulate the crayon over the surface.
 I ripped up a piece of a vintage reader book to add some text to the collage.  Again, I adhered it with Collage Medium, added a layer over the top and let it dry.  Then added the crayon work to blend in.
 That looks yummy to me!
I painted the frame of the Framed Panel with Antique Linen Distress Paint.  Once dry, I rubbed Collage Medium over the surface of the frame to seal.  Not a "must-do" but I like the way it gives the frame a smooth finish.
Adhere the completed frame to the back with the collage.
 I love these ladies and in the biggest size that comes in the Paper Dolls package they are perfect for this project.  I still stand by using Clear Gesso over the Paper Dolls to help keep their color so that is just what I did - once dry, I colored them with a variety of Distress Markers.
I used a double stack of foam pads to raise the ladies over the Baseboard.  The Timepiece has been colored with three colored of Distress Crayon - Tattered Rose, Shabby Shutters and Gathered Twigs.  I have added a Clock Hand to the Timepiece with a Long Fastener.  I also added a Quote Chip at the bottom.
Now to add the flowers to the collage.  They really can be placed anywhere.  Much of it depends on how many flowers you created.
 I love this grouping of very different flowers.  The color is what brings them together.
I added the fork from the silverware set to hold a small flag made from cardstock and a Remnant Rub.  I thought the two sentiments went together perfectly, since it really is up to us to make any possibility of good into reality.
Here is the finished piece.  You don't see much of the Worn Wallpaper...just hints here are there.  I already have this piece on an easel in my craft room so I can see it every day.  I mean who doesn't need a daily reminder to think of all the good things that are possible each day!

They just look happy...which makes me happy.
now carry on,
paula

Friday, July 8, 2016

Ordinary Life

Hi everyone!  Glad to be back today with a fun project made with lots of Distress Paint, one of my favortie mediums!
I am starting with Ranger Mixed Media paper as my substrate.  I cut one sheet of paper in half lengthwise to get two strips 11 x 4 1/4" wide.  I glued the two strips together using a tape runner and then created an accordion fold (about every 3 1/2").
 
You can better see here how the pieces folded up.
 It's a small accordion book but that's what I'm looking for, for my little paint experiment.
Open the book up and paint a layer of Media White Gesso.  Take the time to let the front dry before before flipping over and repeating the step on the backside.  Once dry, the gesso might leave a little grit on the surface.  Use your Sanding Grip to lightly run over the surface to smooth out just a bit.  What I like about the gesso is that it gives a great paper like Mixed Media cardstock the ability to withstand multiple layers of wet medium (basically it toughens it up).  I also like that once I'm done, the paper will feel more like leather.  I'm my opinion you can never get that feeling without beginning with gesso.
Warning...this is the part where I warn you that it's going to be bad before it gets good - so stick with me till the end!

My challenge today was to use paints that I don't automatically reach for (like Ice Spruce).  So I have chosen Twisted Citron, Evergreen Bough, Seedless Preserves, and Black Soot.  I did get out a second Craft Mat since my project is so long!
I started with the brightest color, Twisted Citron.  I used a paint brush to add splotches along the strip.
Next I added Evergreen Bough with the paint brush just like the previous step but then manipulated the color with a wet wipe.  I know it's bright (and seriously, it was even brighter in person).
 Next up is the Seedless Preserves.  Again, the wet wipe kept the color from taking over.
 After drying the paint with a heat tool I added vintage book text with Distress Collage Medium.
This is what it looks like running down the table.  No rhyme or reason to placement. I just used my hands to put the glue on the back and then a thin coating over the top the paper pieces.  Let dry.
I poured the black paint out of the bottle and used my Ranger Craft Scraper to pick up some paint and add it to the project.
 I started out small...
 And then just decided to go for it.
After the black paint was dry, I used the Mini Layering Stencil - Plus and a clean Blending Tool to add Worn Lipstick Paint in random places. 
Once the paint was dry, I inked over the Worn Lipstick and Twisted Citron with Gathered Twigs Distress Ink.   You can see in this photo that the plus signs on the right have been inked and the ones on the left have not.  It's a subtle difference but it makes the pink blend in with the other colors. NOTE: my Gathered Twigs has been used a lot so you may have to tap off on a paper towel to get the same subtle aging over the lighter colors.
Next up - the all important stamps!  I'm using a set called Merchantile for the bold numbers and a fine line advertisement stamp (not pictured here)
I couldn't leave the white paint alone.  The Distress Splatter Brush comes to the rescue to judiciously add white splatter over the pages.  This brush is really one of my go to tools in my supplies.
 Big Chat helps tell the story.
 And a little stitching brings in something more than visual texture.
 This is how the piece looks now.  Very different from where I started with the Twisted Citron!
I have had this die cut from the Adventure Words thinlits set sitting on my desk for at least 8 months.  I am totally serious.
8 months.
I refused to throw it away because I was determined to use it on a project.  Well today is the day!  I added some washi tape from my stash (I have no idea where I got it or who makes it) and then stitched across the top.  I love the way the tiny fine lines contrast the big bold pattern, numbers and color.
I flipped the strip over (each end square has previously been painted to match the inside) and added tape to the center white portion (this tape runner is without a doubt my favorite).
 The tape allows me to fold the strip to create pages.
 I added the same washi to the edge to cover the folds.
 A little Distress Stain to color about 25" of Linen Ribbon.
 I also added paint and Slate Alcohol Ink to a Hinge Clip and Number Token (my lucky number 7).
Once the book is folded up it is so cute!  My favorite part is the texture of the pages.  You can run your hand across the paint and it just feels like smooth leather.  Thank you Media Gesso - you are the best!


Here is a look at the inside...


Love the tiny heart from the Heartfelt Bigz die!  I like to cut the hearts in chipboard and keep them in a bag to quickly add them to any project.  You get eleven hearts in different shapes and sizes with every pass!

I sure had a great time making this little book.  I think I will be making more of these since it's an easy way to explore color and texture in a fun way!
now carry on,
paula