Hello friends,I am happy to announce the Tim Holtz idea-ology 2025 Limited Edition Vault Paper Release!
This is a limited return of six classic Tim Holtz idea-ology paper collections that include: Abandoned, Correspondence, Dapper, French Industrial, Memoranda and Wallflower. Even more exciting is that these papers are available in both 12” x 12” and 8” x 8” sizes, offering versatility for various craft projects. All of the Vault papers are individual sheets vs. pads (meaning no gummed edges to deal with). Now that is a dream come true!
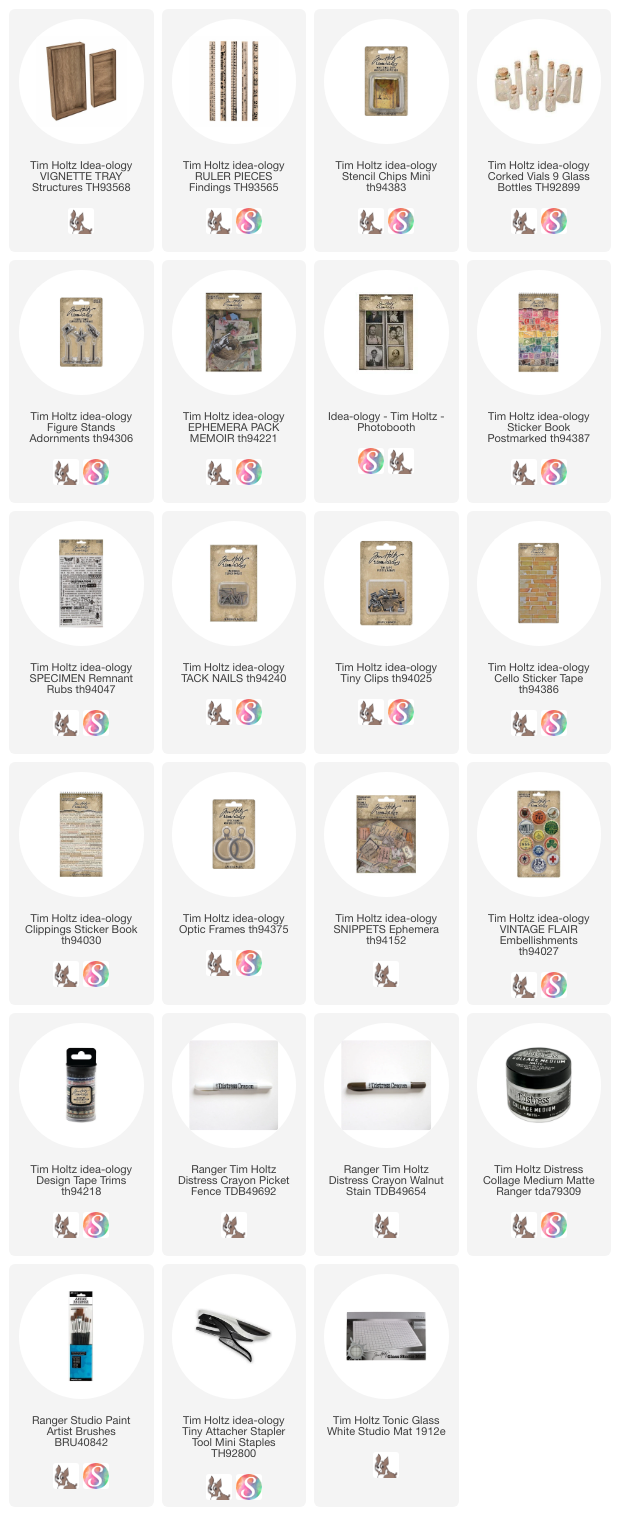
The project I'm sharing today features Dapper paper. I ended up using four different 8 x 8" sheets to complete my creation. I absolutely love the scale of the 8 x 8" size, especially for the small Vignette Tray – it’s the perfect fit!
Starting with a small Vignette Tray as the substrate, choose your favorite papers from the 8 x 8" Dapper Paper collection. Since the tray will be split into three sections, I used three different papers from the Dapper collection + the number paper on the inside edge.
There are three individual pieces in the tray - the top and bottom are approximately 2 1/2 x 4 3/8". The center is approximately 3 1/2 x 4 3/8". I use the word approximately because the total length of the inside is 8 5/8", meaning if you add up my measurements (2 1/2" + 3 1/2" + 2 1/2") you will be 1/8" short. So with that being said, just cut one of the paper an 1/8" longer. The ruler shelves will cover where the paper transitions anyway.
You will still need more paper for the outside of the tray, but since all the papers coordinate it shouldn't be hard to choose a couple that work.
Of course I used Collage Medium to adhere all the paper to the tray because it's the best.
So lets make the shelves.
First I cut 4 wood rulers to size (4 3/8") - they should fit snugly in the tray.
I used Distress Ink to color the rulers. Any brown Distress Ink will do, but since I had a few extra rulers I decided to test colors of ink. I liked Walnut Stain the best, so that is what I went with for this project. Mind you my ink pad is well used so if your is new, beware of how hard you press the ink over the ruler.
Rub ink pad back and forth over the 4 rulers.
Then add Collage Medium over the top. You can use your fingertip or a brush. If you use a brush, place a dollop of Collage Medium on the Studio Mat so you don't contaminate your CM in the jar. You can dry the rulers with a heat tool or leave to dry naturally.
Once dry, add rulers to the tray as shown. I have a tiny level that I used to make sure the shelf is level. I've had it so long I don't remember where I got it, but it was probably Harbor Freight or the Dollar store.
Once the rulers are in place, set the tray aside while you work on other things.
Bottles
I am using bottles from a Corked Vials pack. I wanted to add texture to the glass so I added two layers of Collage Medium, brushing it in different directions and drying between the layers.
Once dry, I added Alcohol Ink in Bayou, Gravel, Wilderness and Flannel to the bottles.
It's been a long time since I've used Remnant Rubs, but today was the perfect time to break them out.
If you rub a bit of ink over the top of the Remnant Rub, it will help to disguise the halo around the words/numbers.
Don't forget the corks. They should look old too! Ink and water will do the trick.
You can even add very small labels (
Snippets Curator) and Cello Sticker Tape to the bottles. I also used a Walnut Stain Crayon to add more grunge.
Even the tiny bottle can be embellished with tiny Curator labels.
I decided to add so gears. I colored a few of them and ended up using 2. Each were painted with Picket Fence Distress Paint (
and when I mean painted, I mean I rubbed it on with my hands). I let the paint dry and then added crayon over the top.
MIDDLE COMPARTMENTOne of the more important things you can have in your stash when making a Vignette project is tiny wood blocks, bingo chips, foam squares in both thin and standard size. These elements are all hidden but they are the "guts" of each project that make all the pieces work together and give you lots of levels. I can't make a tray without them.
Start adding your embellishments to the center compartment with Collage Medium (bottles) and stacked foam squares (gear). There is even a tiny wood plug behind the smallest bottle. It is not only holding it up, but allowing the bottle to be glued to something more than the shelf.
While the embellishments are drying, I painted the 3 pieces from the Figure Stand package and set them aside to dry.
I added the red star (Candied Apple + Black Soot) to the center compartment, along with a bit of shredded cheescloth (now you can't even see the plug behind the bottle anymore).
BOTTOM COMPARTMENT
I added a long piece of ephemera from the Memoir pack + a stamp from the Postmarked Sticker Book. I've got the last bottle in the corner but it is NOT glued in place.
I decide to add another stamp to the center compartment before finishing the bottom. Sometimes that's how things go. I didn't know I needed the blue stamp till I added the red stamp at the bottom.
So here we are back at the bottom with everything filled in. The gear was added first with stacked foam squares. Then the blue bottle and the Mini Stencil Chip with Cello Sticker Tape and a Tiny Clip at the top. The Figure Stand top hat was added last, along with more cheesecloth. NOTE:
a small wood block was added to the back of the Mini Stencil Chip to make it freestanding.I added a Clipping Sticker to the ruler shelf that I thought was perfect for the tray.
TOP COMPARTMENT
I started with a Photobooth image for the top compartment . I colored the image with Distress Crayons. The curtain is Uncharted Mariner, his tie is Rustic Wilderness, and his cheeks are (of course) Aged Mahogany.
I used one of my Vintage Flair buttons to embellish a metal Optic Frame. I mean Tim called it a "frame", right? The flair fits perfectly, but I wanted it to sit a bit lower so I got some small pliers and removed the aluminum ring. It was super easy to bend and pull away from the flair.
Once the ring was discarded, I just added Collage Medium to the edges of the flair and pressed it onto the Optical Frame I had previously painted with white paint and Distress Crayon. Let dry.
So gather all the items going into the top compartment. You can see here I am adding a small wood block to the back of the Photobooth image so it can stand up. I also have a red label from Memoir and a tiny label from Curator. After inking, I just stapled them together with the Tiny Attacher.
And into the vignette Tray they go!
The Optical Frame has a double stack of 3D Foam Squares on the back to push it out from the back of the tray. There is also a Thin 3D Foam Square behind the red label. Anything you can do to create different levels will add more interest.
I'm happy with the way this one turned out. I think the basic tray + ruler shelves is a great idea and really could be used with any theme. I love the idea that you get to control how many shelves go into a project and the spacing between them. The sky is the limit!
Remember, The Vault paper packs are a one and done. So once it’s gone, it’s gone. This is your chance to stock up on these paper collections before they go back in the vault!
Now carry on,
Paula


No comments:
Post a Comment