The Tonic Rotary Media Trimmer has been in my hands for a few weeks now. I freely admit that me and slide trimmers have never been friends. I'd buy one, thinking I could get it to cut straight and no...I couldn't, so I'd store it away till I gave it away to someone who wanted to give it a go. I'd see people use them at events or crops, but I just couldn't get one to work for me. So for the 18 years I have been in the industry, I have use a rotary cutter and self-healing mat board (like quilters use). Yes, I do use Tim's Guillotine Paper Trimmer, but mostly for card bases and quick chopping. Nothing was ever precise enough, sharp enough, or strong enough for my liking. Until now.
The Tonic Rotary Trimmer has been able to cut all the surface I regularly use with ease. Even .50 chipboard, which to me, is incredible for a slide trimmer. The cartridge that caries the blade is smooth and cuts easily. I took my time to cut as many things as I normally would use a trimmer for: watercolor, velum, acetate, mixed media cardstock. All super easy cutting, even two sheets at a time.
So enough about the testing...lets get started on the small project and I'll let you in on why I chose it for the this post.
The Tim Holtz Rotary Media Trimmer is highly engineered and durable, capable of cutting through heavy-duty chipboard (up to 0.05 inch thick), heavyweight cardstock (up to 130lb or 350GSM), synthetic surfaces (Yupo, acetate), and lightweight vellum with ease.
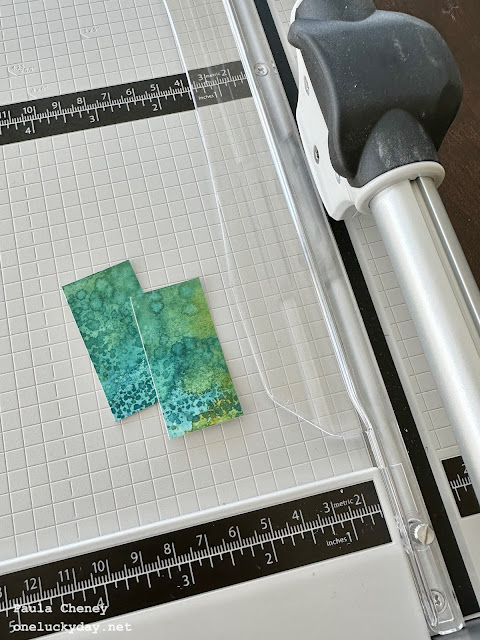
My goal with the trimmer today was to see how small I could go. I know many have been very successful at cutting VERY skinny, long strips (like Kath cutting her own Easter grass). I wanted to try 1" squares because with other cutters, the smaller the paper, the harder it is to hold on to...and if you can't hold on to it, you can't cut it straight. With this trimmer, the plastic guide allows you to hold even a small piece of paper and keeps your fingertips safe!
I started with a couple Distress Ink cards (Watercolor cardstock) from my stash (I made these cards back when I was working on Uncharted Mariner projects for the new color release). I cut a few 1 x 6" strips, then cut them into 1 x 2" pieces. But I wanted to see if I could get a clean 1x1" square from this small piece.
The answer is yes! I was easily able to cut all the 1 x 2", into 1 x 1". The plastic guard held the heavy paper in place while cutting. The rotary cartridge easily slid right through the watercolor paper, even at this small size. * you will need 21 squares to make this project.
I cut a piece of cardstock the same size as a #8 Etcetera Tag and adhered the 1 " squares with Collage Medium. I also added a coat of Collage medium over the top.
Once the Collage Medium was dry, I scribbled Walnut Stain Distress Crayon over the seams and edges. Use a damp finger or paintbrush to disperse the crayon.Next, I adhered the patchwork to the #8 Etcetera Tag and cut the hole at the top for some string.
I didn't want to cover the background so I decided to use the new Collage paper, Photographic. Whatever pieces you add to the tag, just remember you need Collage Medium underneath, then another layer on the top.
You can layer as many images as you wish... even over the top of a pervious one.
I thought this sentiment from the Clippings Sticker book worked perfectly with the scene.
A bit of splattered white paint for good measure.
And some string at the top.
Loving the fact that I could easily cut the 1" squares - something I have never been successful with, with other trimmers. I also love the fact that it cuts like butter. So easy to slide the carriage through thick paper.
Did you missed the YouTube Live about the Tonic Media Trimmer but you want to see exactly what you can cut with it? You can find the You Tube link HERE.
Now carry on,


Great tutorial and thanks for the trimmer 411. It has always been a pet peeve of mine to have crooked cut lines. I will check it out.
ReplyDeleteLove the colors of the squares a lot too .