I'm back today with a project celebrating the release of the much anticipated Layered Leaf Bigz die and texture fade from Sizzix. I have been waiting for this set to arrive so I could test it out. I will tell you, it did not disappoint! Follow along and I will show you what I did...


I am using Distress Stain to color the Watercolor cardstock - Gathered Twigs, Crushed Olive, Ripe Persimmon, and Evergreen bough. Just a little of each onto the Craft Sheet. Remember, the colors are next to each other on the Craft Sheet, not on top of each other. Spray stain with water.
Smoosh (is that a real word?) the card down into the stain and pick it right back up again. Move to a paper towel to dry. The card does not have to be completely dry before you go back into the stain gathering small droplets. Repeat 4 or 5 times until the card has layers of color, then dry completely.
Once it is dry, run the card through the Vagabond/Big Shot machine to die cut the Layered Leaf shape. It really is beautiful with all the different layered colors of Distress Stain. That little hint of Evergreen bough is my favorite part.
So I bet you're thinking, what she gonna do with that leaf?
nothing.
really, truthfully, nothing.
After I cut the leaf I was rather enamored with this...
the leftover shape or negative image or the leaf.
So I set the leaf aside for another day and went to work on the idea in my head (I get those every once in a while).
I cut a piece of Specialty Stamping paper 4 1/4 x 5 3/4" and centered it in the Texture Fade that comes with the Layered Leaf set.
Note: I used 12 x 12" Specialty Stamping Paper to cut my own paper, as the pre-cut sheets are only 4 1/4 x 5 1/2". Yep, only 1/8" shy of what I wanted. Yes, I probably could have adapted the idea if I only owned the smaller size, but since I had one package of the 12 x 12" I used it and cut the size I envisioned.
This is what it looked like when the paper was removed from the texture fade....even better than I imagined.
Until it looked like this.
Another layer of Alcohol ink in Slate to add more depth. I had a few ideas on how to use just this piece so I may have to revisit this again in the future.
Now back to the watercolor paper - I flipped it over onto the Craft Sheet and added a nice coating of Multi Medium over the back of the heavy card. I brushed the glue towards the center of the leaf so the Multi Medium did not get under the cut shape (remember to work quick!).
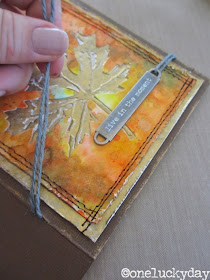
Then added it to the Alcohol Inked leaf. Press down so that all the leaf pieces stay put. As you can see the watercolor paper is just shy of the base piece...just what I wanted, a really nice gold border going all the way around the card front.
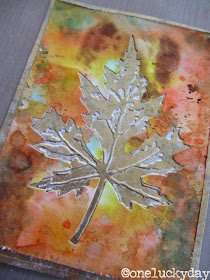
I cut a brown Core'dinations Kraft Core base for my card front and used a tape runner to adhere the leaf to the cardstock. I also used a craft knife to cut a small slit into the folded edge for some Jute String.
Thread 24" of Jute String into the right side of a Word Band. Pull through till the ends are even.
Then wrap around the card front, pulling the two cut ends through the slit in the side of the card.
Tie through the left side of the Word Band.
And there you go.
Super simple.
Absolutely L.O.V.E. this Layered Leaf die/texture fade!
I realize the expectation is that the leaf would have all the mottled color, but in this case the gold is a great foil to the bold color of the stains. It is hard to see how wonderful that gold Alcohol Ink looks in a photo though!
I know I will be trying out this same technique with the Layered Butterfly as soon as possible!
Loving everything about this quick card since it looks like it took way longer than it did. I'm also looking forward to next week when I have some time to tackle the leaf I didn't use today. The Layered Leaf die just moved to the top of my favorites list!
Hope everyone has a great weekend and that it involves a little bit of crafting and spending time with people you love.
now carry on,
paula
UPDATE: the Layered Leaf die is available NOW at Simon Says Stamp!


