Monday, April 29, 2013

Numeric Epiphany

So many things going on this month that I seem to be running from one thing to another and never quite finishing any of them.  Do you know that feeling?
I did find the time on Saturday to volunteer with the local food bank and spend some time with friends having a barbecue.  My friend Liz brought strawberries from a local stand that you can see in the Instagram photo below.  I posted this on Facebook and so many people could not believe what they were seeing that I decided to post it here as well.  Yes, that is an adult size hand the berries are sitting in (nice to live in strawberry country).  In the background you can even see the homemade salsa brought by another friend.  A great start to the barbecuing season if I do say so myself.
So on to today.
I was cleaning up the work table this morning when I had an epiphany about the numbers I used in last weeks project...."these are a great size for home decor".   In fact, in my world, they are the perfect size and the perfect font.

So, I marched directly to the family room an pulled a couple vintage items, a wood box (which I collect) and a wood bench (okay, I have a few of those too).  Both have a really great color but lack decoration of any sort.

I call that the perfect blank slate.
Back down the hall to the workroom.
Out comes the Distress Paint Black Soot and a non-stick craft sheet to squeeze a bit of paint onto.  Of course the stamps were right there so I just needed a Grid-bock to mount the stamp on and some baby wipes to clean them afterward.
I started with the wood box.  The wood was pretty bumpy so chances are I will need a small paintbrush to fill in the missing spots after stamping.
Ink up the stamp (any number will do) with the Distress Paint.
I stamped the box and sure enough, I felt like I needed to paint in some of the missing spaces.  It was really easy to do.  I used a small flat brush for the larger parts and a tiny rounded tip brush for the skinny bits.
Just for comparison: The 5 has just been stamped (you really could leave as is depending on how much distress you like) and the 3 has been stamped and painted in.  The lines were really easy to follow.
 
This is what they looked like once I finished painting.  I could have made them completely black but I wanted a bit of roughness showing.
 
Now just load in a few things....a ceramic pitcher from Pottery Barn bought many years ago, a restaurant number holder with a vintage sign and a nice hanging ivy.  Perfect centerpiece for the game table when not in use.
Now for the bench.  I decided I wanted the numbers on the end.
The wood used to make the bench was much smoother than the box so I just had to stamp this time.
I used the 2 x 7" Grid-block for stamping.  I used the lines on the block to center each number, then each time I stamped I used the top edge of the block as a guide (top arrow) as it touches the underside of the bench top.  As long as I placed each number on the same grid line (bottom arrow), then each number would be at the same level.  Perfect way to avoid crooked numbers.
Remember to stamp, then lift straight up for the best impression. 
Having the other number stamps on the wood while I was stamping helped me keep the correct distance between the numbers.
 
Here it is completed.
I dried the paint with my Heat it tool for a couple minutes, then back out the family room.  This bench sit by my husbands chair (of course it normally has the remote control on top).  Love the detail the number stamp brings to the plain little homemade bench.
I seriously couldn't be happier about both projects (I am quite sure I can find more things to stamp numbers on too).
Cheers for a great week!
(and prayers to get at least one thing checked off my list before I start another project)
 paula


Wednesday, April 24, 2013

Metallic Distress Paint - can't. get. enough.

I didn't have an end result in mind when I started today (sometimes that's a good thing).  I only knew I wanted to use more of that Distress Tarnished Brass Paint, because I love the shine!  I also chose bright pink Distress Stain - Picked Raspberry to go with the gold...it was screaming, USE ME! from the shelf on the wall.  So I did.  Add in the stamp set, Numeric, manila tags and GOLD Embossing Paste from Wendy Vecchi and I think we have something to work with.  So lets get going.
In the last post, I showed how I used the Union Jack flag to stamp to with silver Distress Paint.  In today's post, I used the same resist technique using the Tarnished Brass and the number stamps, Numeric.
One thing I wanted to point out is when you add the Distress Stain to the surface it will bead up on the painted portion just like it shows here.
 Once dry, the number still has some of the residual stain.
Just rub over the paint with a baby wipe or paper towel and the stain rubs right off the painted portion.
Another tip for cleaning the paint off the stamp: use a baby wipe.  The last time, I sprayed the stamp with water and pouncing off on a paper towel.  Using the baby wipe was easier and not nearly as messy as the water dripping everywhere.

Okay, so I have all my tags done...I stamped the tags 1-10.
Next, I stamped each tag with black archival ink and a flourish stamp from the Stamper Anonymous Shabby French set.
Love how they look all together!
To give the tags a bit more detail I used Wendy Vecchi's "Lovely Leaves" stencil leaf stencil and her gold Embossing Paste.  I like that these stencils have a semi-transparent surface so I can see the flourish image below and know I am laying the stencil right where I want it.
I will warn you, the embossing paste does not look gold when you open the jar or when you put it on. Just be patient and let it dry...it will surprise you how nice the gold color is, compared to how it started.
Remember to clean your stencil and scraper immediately after use.
 Set the tags aside to let the stenciled leaves dry.  Man, they look good all together.
I think I will add a little cover to the tag set.
I was cleaning out a drawer the other day and came across some pieces of corrugated cardboard.  I cut two pieces to fit the tag size, one for the front and one for the back.  I peeled off the outside layer of paper on the front cover.
Then colored the cover with Picked Raspberry using the dabber top.
Note:  I did put some of the stain onto the non stick mat and lay the cover into the stain just to get some varying degrees of the pink color.
Next, I squeezed out some on Tarnished Brass paint (remember to shake it up first).
Then ran all the edges of the cardboard through the paint.  I tilted the cardboard forward so that the paint would go up onto the cover just a bit.
Then, just as with the pink stain, I misted just a bit of water into the remaining paint and turned the cover over into it.   Love how it looks like gold veining in rock.  I quickly dried it with a Heat it tool so the paint would not just soak into the cardboard.
Once dry, I painted the backside as well as the other piece of cardboard (for the back) with Tarnish Brass using the dabber tip.
Okay, need some embellishment...must have metal!
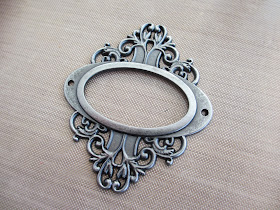
I chose an Ornate Plate for the job since it fit the cover perfectly.
I randomly added some Tarnish Brass Distress Paint.  If you get too much, just wipe some away.
Dry with a Heat it tool just for a minute to start the drying process.
 I went back and added Black Soot Distress Paint over the top of the gold and dried it again.
 Don't forget the brads.
I added a cardstock piece with Remnant Rubs for the title.  I thought this might be the perfect little book to record 10 "lucky" things.   And really?  how could I pass it up since it has such personal meaning?
I decided I did not want the brad legs showing on the other side of the cover so I inserted the brads and just pushed the ends towards the center of the Ornate Plate.  Then I glued the plate to the cover.
I added a ring at the top to keep everything together.  Now just to finish the pages with my thoughts...sounds like a good job to do on the weekend.
I have to say, I love how one piece of cardboard can look so good and really make the whole project.
Look how fabulous the gold Embossing Paste leaves turned out once dry...love that you can see the black stamping underneath.

Cheers for a great day! 
paula