On Saturday I went to a local tag sale and found this big frame for $20. Gold and a bit junky, but solid wood... just what I was looking for.
I took it home, scrubbed it up (okay, I really just sanded it a bit) and painted it one of the colors from the swatches I showed you recently...Avocado Green. The man at Home Depot asked my husband, "what are you painting this color?" with a very puzzled sympathetic look on his face.
Once the green paint was dry, I sanded the edges to bring back the gold, then gave it the once over with some Burnt Umber glaze I had leftover from some other project. I wiped off the glaze with a damp rag before it dried to give it an aged appearance.


Here comes the ceiling tile again...cut to fit the frame opening.
Add a layer of batting. You could use Warm and Natural bating for a thinner layer but this is what I had on hand. I did not wrap the batting around the ceiling tile because mine fit just right in the frame but you could if you like.
Cut a fabric piece 3" larger (on all sides) than your ceiling tile. So if my ceiling tile is 20 x 30" I would need a fabric piece that is cut 26 x 36". Add fabric to the top...remember to iron fabric before you add it to your layer sandwich.
Flip the entire board over.
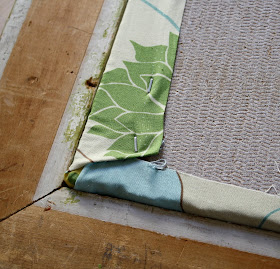
Staple the corners with a staple gun. I took this picture when I was testing the fit in the frame. I did the actual stapling when the tile was still on the table. Staple top, then bottom, then one side and then the other so the fabric stays centered, not pulling too much in one direction.
Now how to keep the ceiling tile from falling out of the frame? Well, you know me, I not going to go to the store for something. I figured cardboard would work as good as anything else so I got a box from the garage and cut it into 4 wide strips with my roller cutter. Then I stapled the cardboard directly to the wood over each corner of the frame. Don't try and staple the cardboard to the ceiling tile or the pressure will push the tile right back out of the frame and could possibly break it (can you tell I tried that?). I also found that if I bent the cardboard right where I wanted to staple, it was easier to get the pressure I needed to make the staple stay in the wood.


Here's the result...a nice big pin board for my work space. The picture shows it leaning but I will have my husband put 2 heavy picture hangers on each of the tops corners to hang it on the wall.
I also could have ran ribbon in a criss-cross pattern over the whole fabric portion but I have found that the ribbon is never in the right place to tuck something under it. So I decided that this time...no ribbon.
I will pin things freely wherever I please.


